
These are the 2 Loom videos (1 short and 1 long) of my ResearchEd talks that I was fortunate to present at Durrington, Rugby, Surrey and Cardiff. Huge thanks to @shaun_allison, @judehunton, @GeogMarsh, @MrWiseCHS and @garein for the opportunity and enormous thanks to everyone that came to listen to any of these talks.
The short(er) Loom video

(for #rEDDurringtonLoom) is here.
The longer Loom based on the final talk

@cymru_ed ‘s YouTube channel is here.
This blog has links to most of the blogs on spacing that “feature” in my talk and this new(ish) blog also featured in the talk in Cardiff.
Diolch.

This is the third blog in the CogSciSci symposium on retrieval practice in the classroom. You should read the introduction to this symposium here and the follow up blog here by Adam Boxer.
This blog focuses on using Adam’s Retrieval Roulette as the source of retrieval practice and why I believe it is the best resource I have ever used. Pretty much every lesson I teach starts with 6 questions…..
I am going to talk through 2 tweaks that help me get the very best out of Retrieval Roulette. One (hopefully) improves schema formation and the other (hopefully) improves long term retention by thinking carefully about the spacing of the questions once a topic has been completed.
Preamble
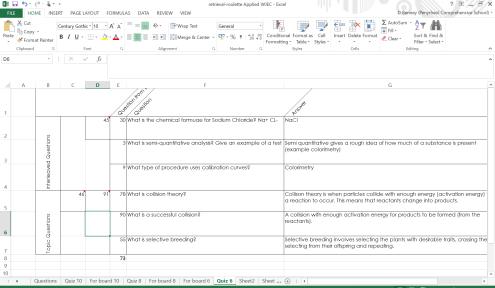
The only part of retrieval roulette that takes any time at all is inputting the questions in the first place. Once complete, the retrieval roulette question tab looks like this. I would recommend including the topic title for each question and as far as possible, match the order of the questions to the order that you will teach.

In this example (my lesson starters are always the quiz 6):

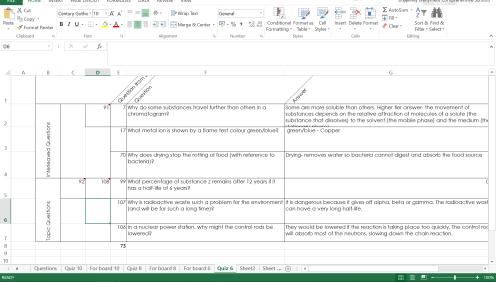
My previous topics go from q1 to 91. The current topic (Controlling Chemical Processes 2) has been going for a few lessons. The total content runs from q 92 to 108 but the number only goes up to 101 for the lesson because that is the content covered so far.
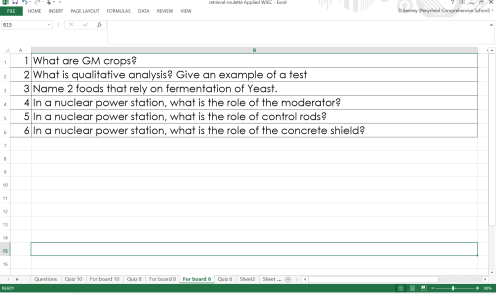
The randomly selected (within my stated parameters) questions look like this on the board with 3 questions randomly selected from 1-91 and 3 from 92-101:

As the topic progresses I simply change the end number of the topic questions. Later in the topic it would look like this:
This would be the question set up when I finish the topic. After the lesson is completed I have officially finished the topic. So far, so good. For how to use RR from the horse’s mouth, click here.
Tweak 1- schema building
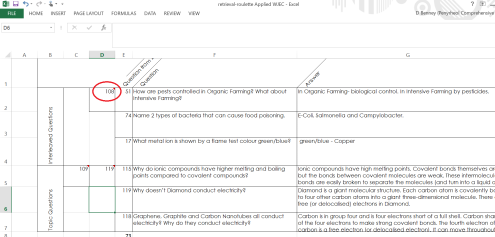
The 3 current topic questions are very useful for schema building. However, they are chosen at random from within the parameters that I have set. If I am conscious that there is a nugget of knowledge/concept or two (or three) that we have covered in recent previous lessons that they need to build on in today’s lesson then I can manually type the numbers of the questions here:

For example, if today’s lesson is about under what circumstances in a nuclear power plant would the control rods be lowered and under what circumstances would they be raised, then recall and understanding of q102, and q103 would be particularly important.
This means I can explore these answers in more detail and my checking for understanding plays a critical role. My pupils need to be able to recall and understand these so we can successfully build on it in today’s lesson. This is building the type of schema that I want them to have. So retrieval roulette can ensure they have the prior knowledge ready and available to further build into a beautifully formed schema. These 6 questions beautifully combine Rosenshine’s daily review (first 3 questions) and weekly & monthly review (last 3 questions).
NOTE- WHEN TYPING NUMBERS MANUALLY INTO RETRIEVAL ROULETTE, DO NOT SAVE WHEN FINISHED!!!!!!
Tweak 2
Once the topic is complete, the standard way of using Retrieval Roulette would be to include the just finished topic (qs 92-108) within the interleaved questions by changing this to 108.

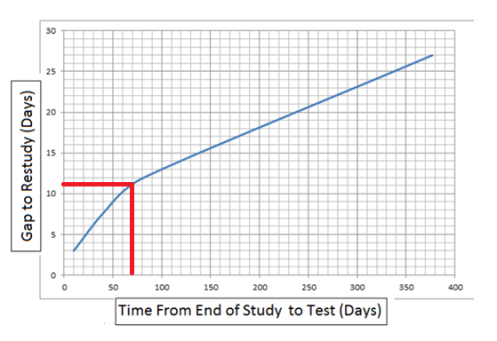
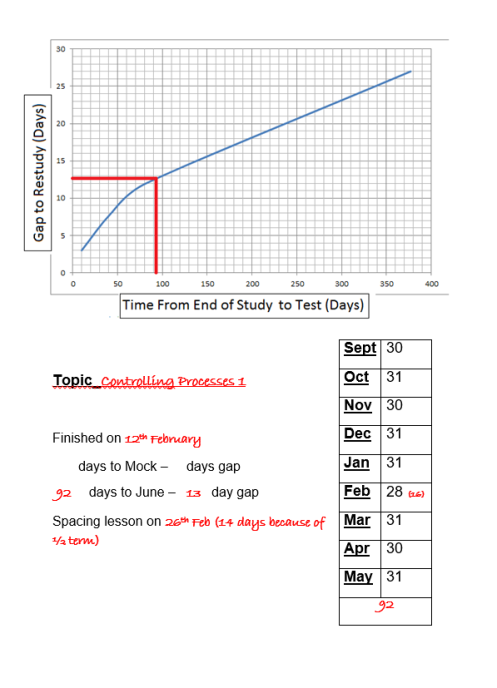
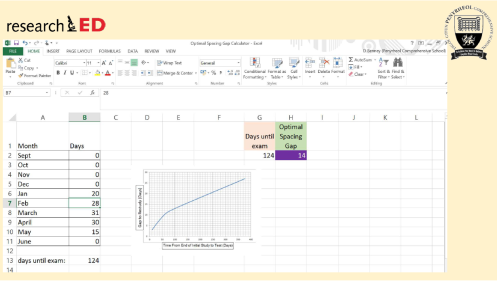
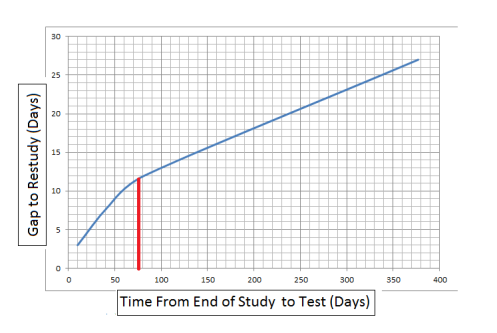
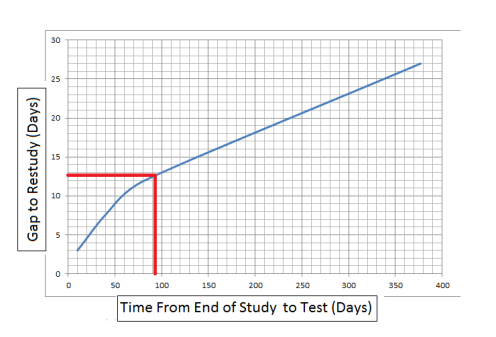
However, I want to build in some time for my pupils to forget the recently finished topic. I will use my spacing graph (more here) to calculate the time I need to leave between finishing the topic and revisiting it with a spacing lesson.
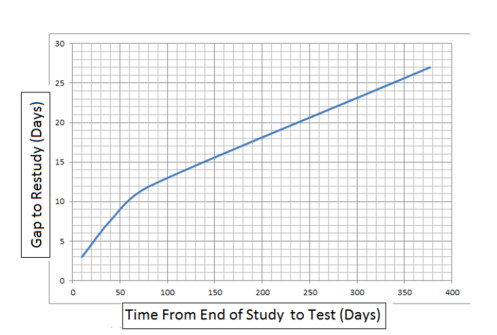
In this example, I have finished the topic Controlling Processes 2 on March 4th. This leaves 69 days until the exam on May 15th. This means the optimal time to revisit it would be after 11 days.
So, I want to hold off from including questions 92 – 108 until after I have had my spacing lesson on 15th March. The reason for the delay is that I want:
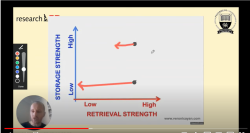
- The pupils retrieval strength to decrease for the topic
- On March 15th, retrieval will be effortful but hopefully still successful for much of the content. This is because retrieval strength has dropped but (hopefully) not as far as zero.
- When pupils successfully retrieve something with a low retrieval strength they get a boost in the retrieval strength and (crucially) the storage strength of that information. See here for a full explanation by Veronica Yan. This is why spaced retrieval practice is a desirable difficulty.
- As a consequence (after successful retrieval), the information’s retrieval strength decreases more slowly and even if retrieval strength drops to zero, the higher storage strength means it will be more easily relearned (because storage strength does not decrease).

So, in the lesson following the completion of the topic of Controlling Processes 2, the retrieval roulette looks like this:
This way the 6 questions will all be from previously covered topics but won’t include the recently finished topic of controlling chemical processes 2. This gives time for forgetting (or for retrieval strength to decrease).
As I move through the new topic (Materials for a Purpose 1) the retrieval roulette looks like this:

Current topic coverage goes from q 109 to 115. Crucially, questions 92 to 108 are still not included in the Retrieval Roulette.
Then on the 15th of March I do my spacing lessons with the pupils. This is a retrieval activity. It looks like this (for more on this read here and here) :

The very next lesson, questions 92 to 108 join the interleaved questions in the retrieval roulette. It looks something like this:
I am happy for questions 92 to 108 to come up randomly from now. I have had a spacing gap to allow retrieval strength to drop. The spacing retrieval task will therefore have allowed for a big boost in storage strength.
As a department we also upload all the topic questions to quizlet. This makes sure pupils do retrieval practice at home for homework as well as part of a coordinated revision package.
Just one final anecdote (if I may). In Monday’s year 11 parents’ evening a pupil told me how useful she found the questions at the start of the lesson in making sure she remembers the content from the whole year. Retrieval roulette is doing its job.
It was a pleasure to attend the researchED event at Durrington High School on Saturday 27th April. Massive thanks to @shaun_allison and the team for organizing such a fantastic day. HUGE thanks to those that attended my session. In time I hope to write a blog about the talk. In the meantime the slides are linked at the bottom of the post and there are a number of links here that I referenced during the session.
Here is a link to “Making it hard on yourself, but in a good way” by Robert and Elizabeth Bjork.

This is the post by @EdScientists which appeared on the Learning Scientists website which brilliantly explains the interaction between storage strength and retrieval strength.

This post is my early attempts at implementing spacing and retrieval practice (in Maths).
This post is my effort to introduce spacing into Year 10 Science (a content heavy year).

This post (following the email I had from Dylan Wiliam- Achievement Unlocked) is my attempt at finding the optimal spacing gap.

This post is a follow up and contains examples of the spacing grids I used for the “spacing lessons”. All my spacing grids can be downloaded and modified here.
This is the brilliant post by (the also brilliant) @Tom_Needham_ on applying cognitive load theory – the problem completion effect.
This post is where I look at Tom’s post on Rosenshine, Direct Instruction and Cognitive Load Theory and try to fit Desirable Difficulties alongside them. It is also an example of using the “line of duty” effect during the year.
This is a post written for the EIC and it contains the excel “optimum gap” calculator that can be downloaded.
Finally, this is the @mrbartonmaths podcast with the Bjorks that is essential listening. This is a link to the further reading section on Craig Barton’s website.


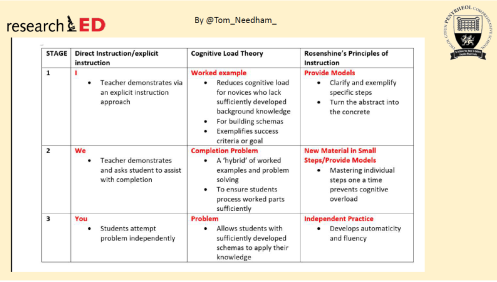
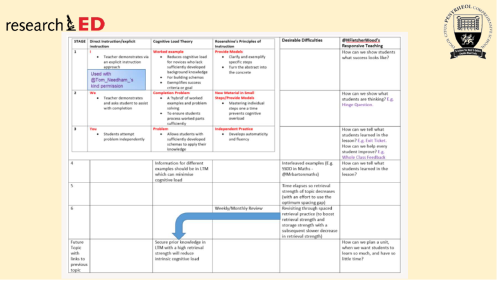
I loved this blog by @Tom_Needham_ and I was really taken by his linking of Direct Instruction, Cognitive Load Theory and Rosenshine’s principles of instructions (link to @teacherhead). They fitted together so well but I wondered where desirable difficulties, in particular, fitted in here. Having recently finished @HFletcherWood’s excellent responsive teaching book I wondered where this might fit in too. Tom gave me permission to use his original document and I came up with this:
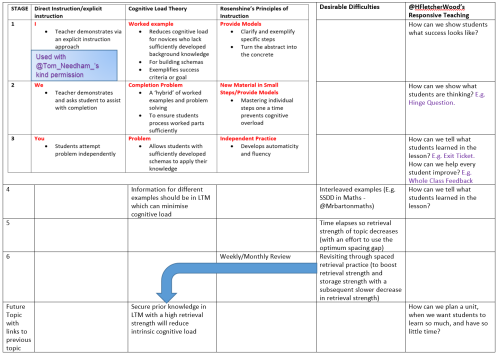
Cognitive Load Theory and Desirable Difficulties do seem to be in conflict with each other. CLT is about ensuring that working memory is not overloaded when learning (keeping things as simple and “clean” as possible) and desirable difficulties is a deliberate introduction of strategies that make learning harder. The kicker here is that introducing desirable difficulties (such as spacing, interleaving and retrieval practice) should increase the long term retention and transfer of learning.
For more on CLT, try this by @Olicav or this by @mrbartonmaths.
For more on desirable difficulties, try this by Robert Bjork or this by @greg_ashman.
I think desirable difficulties and cognitive load theory can be reconciled. Desirable difficulties should only be introduced at a late(r) stage into an instructional sequence (stage 4 above). At that late stage, implementing desirable difficulties should ensure that this knowledge will be available, with good storage and retrieval strength, in Long Term Memory which helps minimise cognitive load during future topics that link with the current topic. This also helps pupils build organised schema. See this by @DavidDidau for more on schema.
To give a concrete example:
In September, I taught my Year 11 pupils about flame tests and precipitate reactions for metal ions and non metal ions. After reading Responsive Teaching, particularly the chapter on unit planing, I became a lot more aware of how this links with a future topic – ionic and covalent bonding (to be covered in Feb/March). Because of this increased awareness , in September I explicitly taught the electron configuration of the metal ions as well as some non metal ions. At the end of that unit I would expect pupils to:
- be able to draw the electron structure of the atoms in groups 1, 2, 6 and 7 (from the first few periods)
- know the link between number of electrons in outer shell and group number
- know the difference between an atom and an ion
- know how many electrons are lost/gained when atoms in group 1/2/6/7 form ions
- “work out” the chemical formulae for some ionic compounds using the common ions table (and how to use bar modelling to check the plausibility of their answers –more here by @chipps_sci)
From this they would have a basic understanding of ionic bonding which involves transfer of electrons and formation of positive and negative ions.
The key here is understanding why I have covered more than I have needed to for this particular topic. Using the idea of Horizon Knowledge (see this by @HFletcherWood) I wanted to commit the above knowledge to Long Term Memory to minimise intrinsic load and aid schema building when I then teach Ionic and Covalent bonding later in the year.
Once I have finished the topic in September I used my optimum spacing graph to work out when to revisit the topic (more here):

The spaced retrieval (followed by further spaced appearances via the use of @adamboxer1’s retrieval roulette) are the desirable difficulties that will help commit the knowledge to LTM. These desirable difficulties should mean that by the time Feb/March comes, this knowledge should be “fingertip” knowledge, having both a high storage and high retrieval strength.
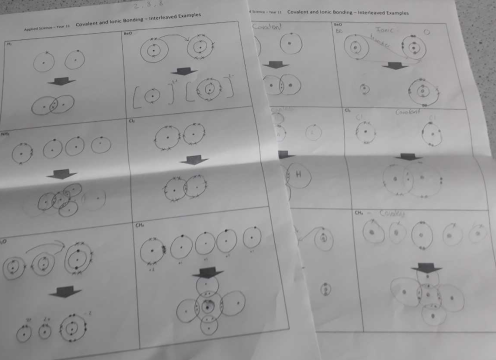
Feb/March- teaching ionic and covalent bonding. To start I will have a few multiple choice questions ensuring that pupils do have the background knowledge at their fingertips. These are, in effect, hinge questions because if some pupils are not secure then I can’t go any further until they are. However, I would be confident that pupils would be clear how (for example) sodium and chloride ions are formed. Then, and this really follows the 1, 2 and 3 model in @Tom_Needham_’s document, I would model how ionic bonding works using dot and cross diagrams. Then all the pupils would have a go at a common problem. This would be followed by a boundary example (an example which would be as challenging as it could get- idea from @mrbartonmaths). This would look like this:
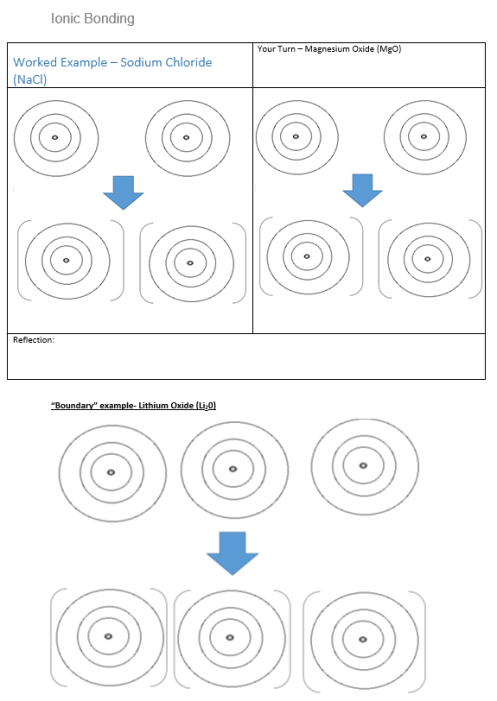
This is the I and the We element. Before handing over to pupils to practise ionic dots and crosses diagrams, I would ask a hinge question to ensure they are ready for independent practice.
Then on to the You element:

Nothing earth shattering in this. However, one of the key concepts in this topic is to understand why ionic compounds have such high melting points and why they don’t conduct electricity when they are solid. This blog by @ChemDrK reminded me that pupils won’t necessarily “get this” because of the way we teach dot and cross diagrams. However, by this stage I would expect pupils to have a well formed schema of ionic bonding and this can keep intrinsic cognitive load down when explaining the formation of the ionic lattice. Having used desirable difficulties to build up the retrieval (and storage) strength for the background knowledge that they need, I will be confident that intrinsic cognitive load can be managed. Then they can think about the 3D structure of the ionic lattice rather than “what is an ion?”, “where have the electrons gone?”, “why is that one negatively charged and that one is positively charged?” etc. Instead they can think about what I need them to think about.
Covalent bonding would be covered in a similar I, We, You pattern.
Before moving on to stage 4, I would give pupils an exit ticket just to check they can do ionic and covalent bonding dot and cross diagrams.
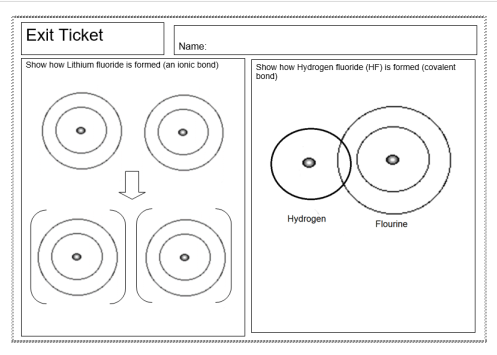
This will make me more confident that the pupils are ready for the interleaved examples. If any pupils show errors in these tickets then next lesson I can work with those while the rest of the class attempts the interleaved examples. So next lesson pupils would have to draw dot and cross diagrams for a mixture of ionic and covalent structures. These are similar to @mrbartonmaths’s Same Surface Different Deep as the pupils must first decide if it is ionic or covalent before carrying out the correct procedure and drawing the correct dot and cross diagram.

This is cognitively more demanding. A desirable difficulty. But I am banking on the pupils having the correct knowledge easily retrievable from their long term memories. This will help minimise intrinsic cognitive load. Some pupils may need to still rely on their notes but as this blog by @adamboxer1 shows, that is another useful way of managing cognitive load.
After finishing this topic there is then a measured spacing gap before we revisit ionic and covalent bonding for a spaced retrieval activity. The desirable difficulties here should mean that pupils are ready to show their knowledge in the GCSE exam. And beyond.
I am starting to get more comfortable with the link between desirable difficuties and cognitive load, particularly using desirable difficulties in an earlier topic to reduce intrinsic load in a future topic. It is like when you are watching a 6 part television series (say Line of Duty) and something seemingly inconsequential is shared in episode 2. However, as the plot develops in episode 6, that earlier scene is revealed to have been integral to the plot and has enhanced the audience’s understanding of it.
Feedback, as always, is welcome.
Evaluation of “trying to apply research” in the classroom – part 2 -Pupil feedback and my evaluation

This post follows up part 1 (here) which gives the background on the “best bets” of research that I have been applying in recent years. Part 2 looks at what pupils made of the strategies and my own evaluation. This is part of my presentation that I gave at the (wonderful) #theory2impact conference on 10th May which was organised by @ImpactWales)
Note- using pupil voice is not without pitfalls because pupils do not always know what is best for their learning. The beauty of this is that if they say good things then you take it, but if they say bad things then you just say that they don’t know what is best for their learning…………
Having read this blog post by @missdcox I decided to gather the views of my class. I gave each pupil the following question sheet:

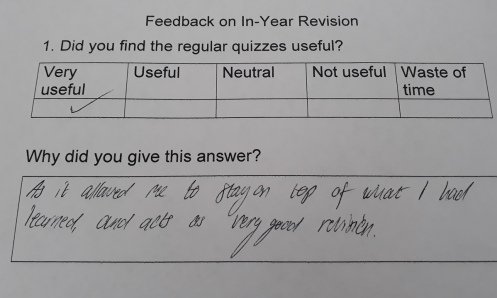
The first question was on the regular (low stakes) quizzes. The response was:

Pupils gave the following reasons for their answers:
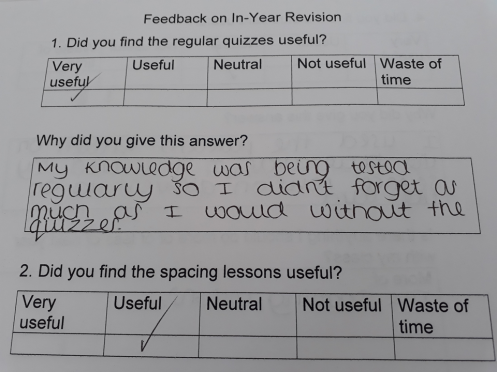


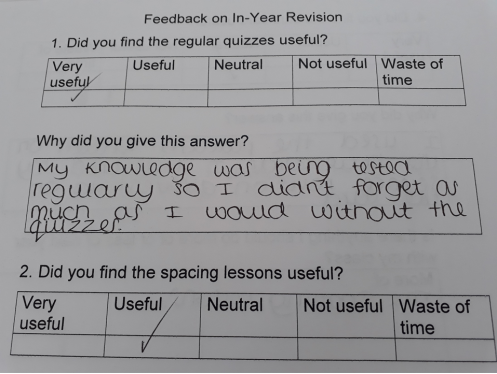

The last response is interesting. It is a fair challenge. However, I was able to remind pupils that not wasting time writing down the question means that we can cover more content for retrieval practice. Besides, I am looking to make a change in their brains, not in the back of their books.
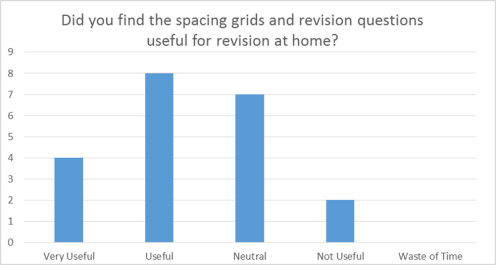
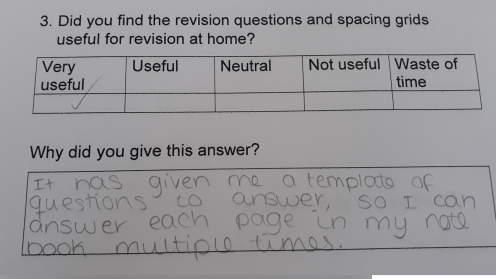
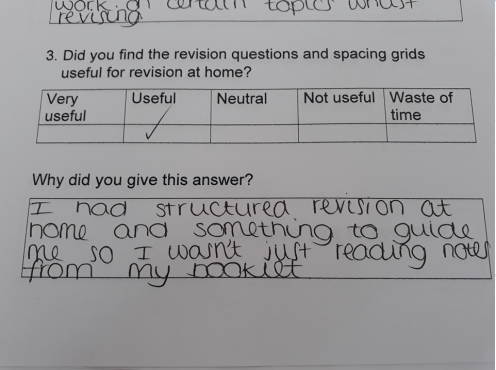
The second question was on the spacing grids used in the spacing lessons (all explained in part 1).
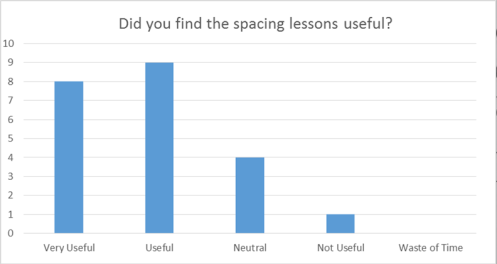
Pupils gave the following reasons for their answers:
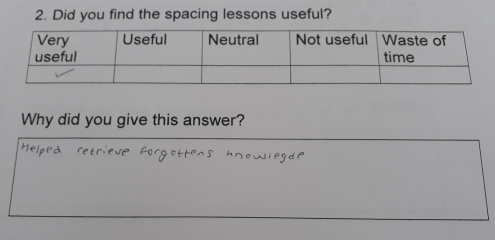
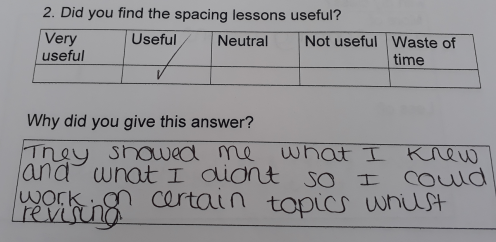
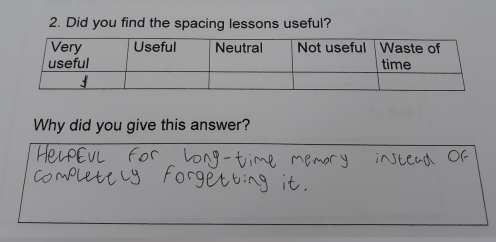


Very positive responses (in the main). I think these responses show that pupils understood why we were doing what we were doing. I have spent time over the last 2 years fully explaining the why of these strategies to the pupils. This has been vital.
Note the question. It asks if they were useful rather than whether they enjoyed them. This is important because pupils didn’t enjoy the spacing tasks. Not one bit. They found them hard. They were trying to recall content that we had moved on from up to 3 weeks previously. It was desirably difficult. But the key was that pupils understood the rationale behind it. This meant they put their full effort into it despite it being hard.
Copies of the spacing grids and a set of revision questions (a set for each topic- pretty much made from the questions we had used for low stakes quizzes- see here for examples) were then given to pupils well before their summer exam so that they could be used for revision. I hate the notion that we tell pupils “off you go and revise” without giving them something concrete to use for revision (and as a consequence, at best they just read and highlight- more here).

The last question was on the use of their blue revision card. This is based on (well, stolen from) an idea by @ChemDrK here:
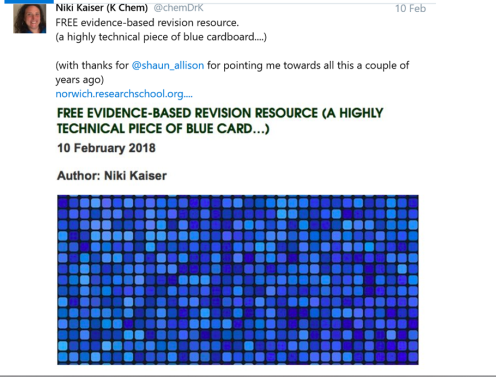
This is the blue card:
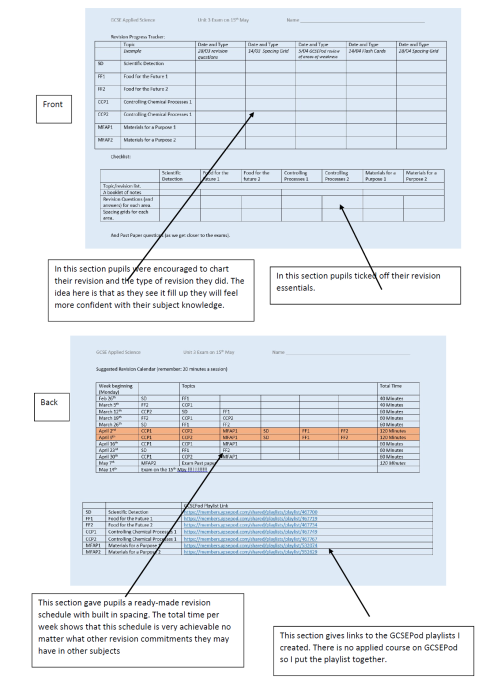
So the back contained a ready made (spaced) revision timetable. And the spacing grids and questions gave ready made revision material.
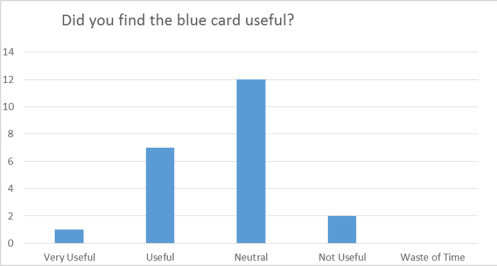
Less positive responses here. However, the reasons were far more reassuring:

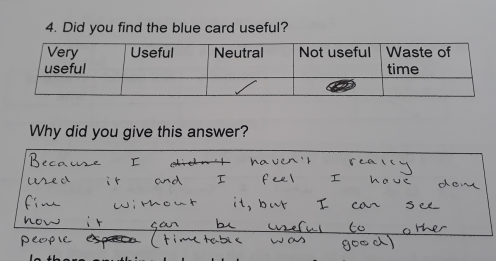

The key here is that pupils were revising. The blue card gives some structure and guidance but as long as they are revising it is not vital that they are using it.
My Reflection
I appreciate that the ultimate evaluation will happen when their exam marks come through in August but until then:
- The in-year revision is helpful to all. It even gives pupils who will do no revision outside of school a fighting chance of success (you can’t wing a science exam, it is too content heavy). Not that I am condoning “no revision” outside of the classroom from any pupils.
- I was comfortable that I had provided them with the support and guidance to do their own revision. They could not say they didn’t know how, what and when to revise. I can’t control whether they do of course. But I know I can do no more.
- Keeping on top of revision during the year fills the pupils with confidence. They are aware that they know content from as far back as September. This also boosts their positive perception of the subject. I believe this means they are more likely to revise as they can see that they have a chance of success.
- Having lots of “fingertip knowledge” made future learning easier. Pupils’ knowledge of flame tests for metal ions makes teaching ionic bonding (4 months later) a lot easier
- With three weeks to go before their exam, my focus switched to practising exam technique and applying their knowledge on past paper questions (thanks @danielharvey9). I didn’t have to reteach the course. I didn’t have the frustration that they are missing (because they have forgotten) huge chunks of background knowledge.
- Irrespective of the exam, I want my pupils to know as much Science as they can. It is a great subject. These strategies have helped (I think).
Part 3 will follow and will focus on trying to implement these strategies at a whole school level.
Footnote- Year 11 Green – you have worked extremely hard; I hope you get your reward in August.
This blog looks at how I have tried to implement the “best bets” of research in my classroom this year. It also covers much of what I discussed in my session for the @ImpactWales conference on theory into practice. It was a pleasure to work with @pimpmymemory and to present as the practitioner linked with the theory that she shared in her (brilliant) session. Some of the wonderful work of Carolina (and the rest of the Learning Scientists) can be found here and this has been a very big influence on the “best bets” of research that I have been implementing (thanks to @C_Hendrick and @robin_mcp for the best bets quote- from their brilliant book).
Spacing and retrieval have been my “best bets” for the last 3 years and to read what I did in 2015-16 click here, and for 2016-17 click here.
For 2017-18 I wanted to continue to push retrieval and spacing. I also wanted to make better use of the optimal spacing graph that I produced:
For more on this, the blog is here.
For me, the optimal spacing gap seemed a “best bet” within the “best bet” of spacing. This is how I have used it this year.
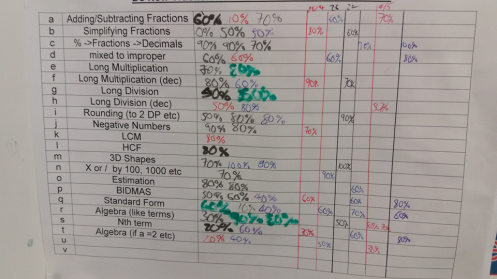
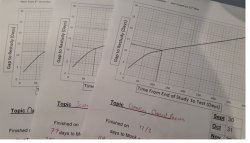
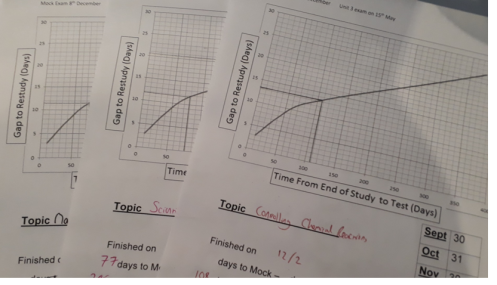
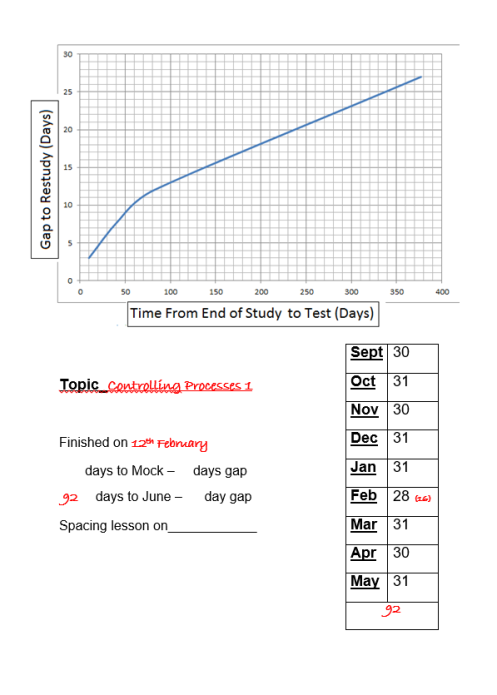
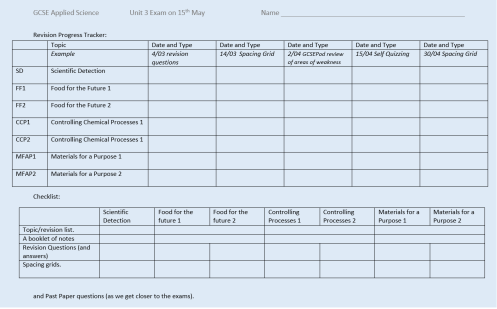
At the start of the year I produced these sheets to be filled in once each topic had been completed:
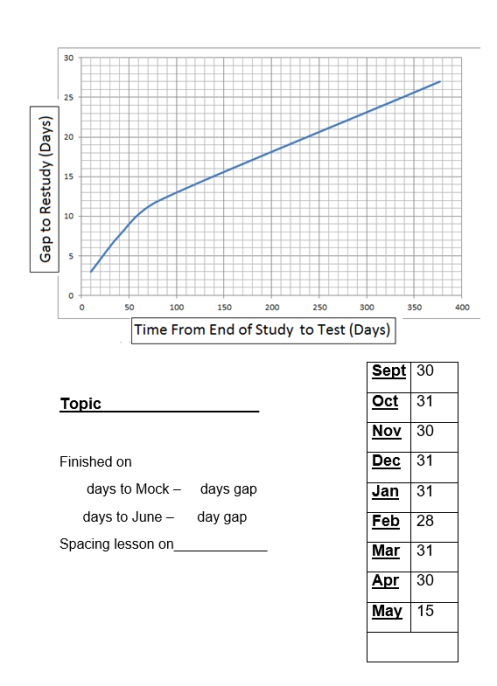
I used the spacing graph to decide on when would be the best time to revisit a topic once it has been completed (not easy to decide as I wasn’t sure whether to focus on the optimal spacing gap for the mock or the optimal spacing gap for the final exam). In the end I decided to use a spacing interval that would be closer to the spacing gap for the terminal exam.
So, for the first topic (Scientific Detection), I did this:

The days to the final test (mock on the 14th Dec or final exam on the 15th May) were then used to calculate the optimal spacing gap:

The above gives the optimal spacing gap for the mock exam.


The above also shows the optimal gap for the final exam. I needed to decide which to use and decided that the terminal exam was the most important so I would use the spacing gap (20 days) for this. The sheet looked like this:

Last year I set “lag homeworks” but this year I wanted a bit ore control over the spacing task so I designed “spacing grids” that pupils would complete in the spacing lesson. Like the lag homeworks from last year, pupils would retrieve from memory in one colour and then add what is missing in another colour as I go through what should be in each box. This means that if pupils fill in the grid in the future they can see whether they remember more (or less) than the first time they used them. The spacing grids looked like:

and:

By using these grids for retrieval after a delay (the optimal delay), we were taking advantage of some best bets- spacing and retrieval. Here is a link to all the spacing grids.
Here is another example of how the sheets worked:
So the completed sheet looked like:
The other way that I tried to use retrieval practice (and tried to make revision something we did during the year) was to absolutely hammer low stakes quizzes. Every lesson started (or ended) with 5 or more questions chosen from across the year. Pupils completed them at the back of their books. The only caveat to this was that I didn’t include questions on a topic which had been completed but not yet had the spacing lesson (I wanted to give pupils time for their retrieval strength to drop so that a successful retrieval during the spacing lesson would give a boost to storage and retrieval strength of that information). In April, pupils were still being quizzed on topics we covered in September.
By the end of the year there is probably as much work in the back of their books.

Part 2 will follow soon and will focus on an evaluation of the spacing lessons and the constant quizzing. I will give my own reflections, discuss the barriers and challenges and share the views of the pupils too.
(Thanks to Finola and Jane at @ImpactWales for inviting me to be part of a wonderful conference. Presenting alongside Anna Bolt, @lucy_crehan, @informed_edu, @GilchristGeorge and @pimpmymemory- Mic well and truly dropped).

This is quite a niche blog, perhaps only of interest to Science and Maths teachers (if I am lucky). This blog owes a huge hat tip to @BenRogersEdu, @emc2andallthat and @mrbartonmaths. Ben’s blog, here, provided the nudge to trial bar modelling (along with @emc2andallthat’s blog and @DSGhataura’s tweets). Craig Barton’s wonderful book (How I wish I had taught Maths) is a must read for any Science teacher (and of course, Maths- and any other teacher to be honest) and I have more takeaways coming in a future blog.
As soon as I read Ben’s blog on bar modelling, I twigged that this would be a great way to (re)teach moles, molar mass and mass equations. It was time to revisit this with my Year 11 Applied Higher tier pupils and I didn’t want to focus on the (hated) formula triangle and just plugging the numbers in without any conceptual understanding. In the mock exam paper, all bar one of the Higher tier pupils struggled with this concept.
After reviewing the concept of moles, relative molecular mass and molar mass:
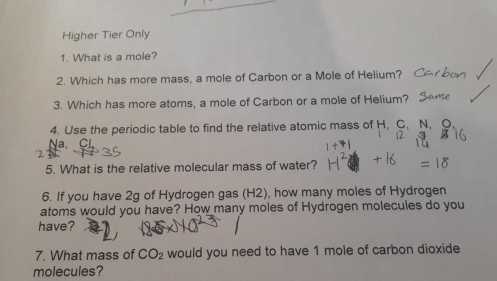
We moved onto calculating the number of moles from a known mass of given compound. This is where the bar modelling came in to play.
The question was, if you have 20g of Helium, how many moles do you have? I modelled this on the board (the key being -the mass goes on top, the molar mass on the bottom) :

Pupils then tried an example on their own (how many moles in 232g of Sodium Chloride):

Then another practice question:
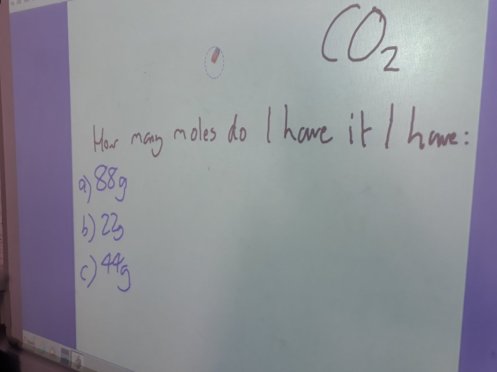
and their response:
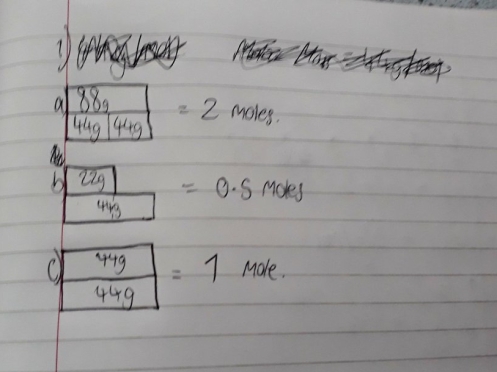
What I really like about using bar modelling for this concept is that if the top (the mass they have) is smaller than the bottom, they can see that they don’t have enough for a single mole so the answer will be a fraction/decimal/less than 1. When the top (the mass they have) is bigger than the bottom, then they can see they have more than 1 mole. Even when working with “difficult numbers” a quick sketch of a bar model can help to give a check as to whether their answer is plausible (thanks @ejsearle for that turn of phrase).
I gave the pupils a homework to pull together some key ideas and to give them the opportunity to practice bar modelling.
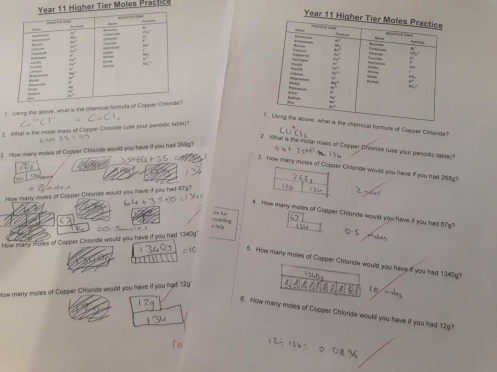 I was pleased to see most pupils continued with the bar modelling. My only feedback was (for the final question) to the pupil on the left to try to make the bars closer to scale and the pupil on the right to sketch the bars so they have something to check against for how plausible their answer is. The bar model would show: less than a mole and a really small fraction of a mole at that. Therefore 0.09 moles is very much plausible.
Interestingly, the one pupil that nailed this in the mock wasn’t fussed with the bar model and didn’t want to use it. If they don’t use it then I hope they can visualize the likely ratio and check their answer in their head.
I knew after dipping my toe into bar modelling that I wanted to continue to use it. As part of our final unit we are looking at materials, their properties and their uses. Density is property that is always important in choosing materials for a purpose. Density also comes up in the Maths GCSE. Because of this, I wanted to ensure that my pupils had a good conceptual understanding of density (rather than just thinking it means heavy or not and plugging the numbers into a calculator). I also wanted to avoid the dreaded formula triangle (I am not a fan as you may be aware by now).
After clarifying what mass and volume are and how they are measured we completed the following worksheet. This is where the reading of Craig Barton’s book came to the fore. I wanted pupils to understand density relative to water density and whether objects would float or sink. This is the handout:
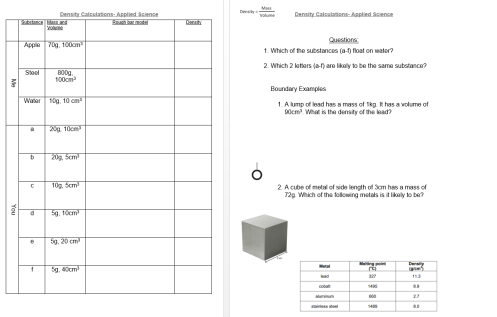
The “me” section was completed by me (who else) on the board and pupils mirrored what I did (this is similar to the worked example-problem pair that Craig advocates).

I was very selective in my worked examples. I chose something that floats, something that sinks and water. This would give the density numbers an anchor for relative comparison.
Pupils then did their examples. I was even more selective for these. As covered by @mrbartonmaths’s book, I wanted minimally different examples. I wanted them to see what the pattern of density would be when the mass is the same but the volume occupied gets bigger in successive examples. Or smaller. Or the mass increases in successive examples but the volume is the same. I also wanted them to use the bar model so they could visualize what this would look like (in terms of ratio). From my worked example we could visualize that “top heavy” models (mass in g greater than volume in cm3) sinks (density more than 1) and “bottom heavy” (density less than 1) floats.

Pupils completed this side well (though if I was being fussy I would want scaling to look more like the middle example).
By choosing these examples I was hoping (and I obviously drew their attention) they would see what happens when mass only changes between the examples and what happens when volume only changes between the examples.
Then onto some questions.
Every single pupil had a, b and c as floaters and also that a and c could be the same substance.

Question 2 really allowed us to explore what the unit g/cm3 actually means as both a and c have different masses and different volumes but each cm3 of a and c has the same mass.
Then the pupils moved onto the “boundary examples”. This is another idea stolen from Craig Barton’s book. He defines boundary examples as weird questions or normal looking questions with weird results. In Science I tend to think of them as “worst case scenario” exam questions that are at the very boundary of what we would expect. Now most pupils quickly twigged that 1kg had to be changed to 1000g (you could argue that by calling this a boundary example I have alerted pupils that there is something more at play here than a standard density question). From here they had no problem.

What was interesting is that a small number of pupils had put 1 on the top of the bar model and 90 on the bottom and had then calculated the answer as 0.17 g/cm3. If they compared their answer to their bar model they would have seen that their answer was plausible. However, one pupil in particular knew her answer wasn’t correct as the bar model was showing it would float and she knew that lead would sink. It was very bottom heavy and this couldn’t be right, she reasoned, as she knew that lead sinks. I would argue that without the bar model, many of the pupils dividing 1 by 90 would have been less likely to spot that the answer is wrong. By including the bar model, if the number (less than 1) doesn’t jump out as wrong then the bar model might. It did with a number of my pupils.
The secondary boundary example also gave some problems. The most common mistake was to divide 72 by 3. This then led most to realise they had made an error. Or some tried some further mathematics to make the answer “work”.
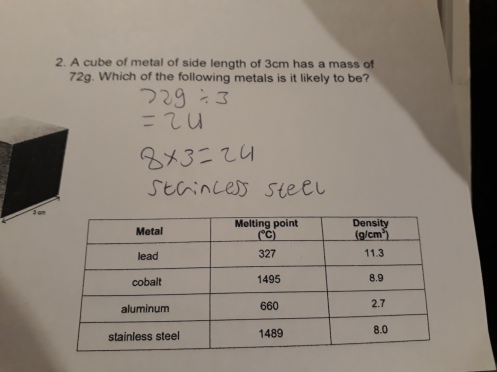
Many pupils did get the answer right but it reminded us that they will be expected to apply their mathematical knowledge in their Science exams and to not just assume that each question will be standard and straight forward (so watch out for boundary questions).
We finished the lesson with a multiple choice question that I scanned using plickers. Their results will dictate how I start next lesson. The question was:
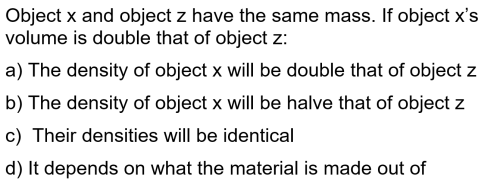
I didn’t let the pupils look back at their worksheet (perhaps a mistake) and I was a little disappointed with the results. The plickers results were:

The fact that a few pupils went for C and D shows that this concept is not fully understood by too many of the group. We will review this answer tomorrow. After Easter break I will set 2 questions, one where volume stays the same but mass increases and another where mass stays the same between 2 objects but the volume increases.
I already have my question planned. It will be:
Object R and P have the same mass. Object R’s volume is 4 times greater than object Ps.
A the density of object R is 4 times smaller than object P.
B the density of object R is 4 times greater than object P.
C it depends on the material
D The density of the 2 objects will be identical
I will scan their answers in using plickers then I will give them the opportunity to check the left hand side of the worksheet we did today and then re-scan if anyone has changed their minds.

I will be aiming for 100% (despite the time they have had to forget).
Thanks so much for reading this far. As ever, constructive critique is always welcome.
(all work shared with pupil permission).

This particular blog is my way of sharing vital revision material (and structure) with my Year 11 Applied class. I hope it is useful for anyone else that may be browsing it.
“How to Revise” blog may be useful. The full document can be viewed and downloaded here.
Suggested Revision Schedule:

(Thanks to @chemDrK for the idea- more in her blog here)
Revision Schedule (blue card) download from: https://www.dropbox.com/s/x16voi318sxvbk4/Revision%20Setup%20Applied%20Science.docx?dl=0
Revision strategies.
Fill in a spacing grid. Do it from memory in 1 colour. Check using your booklets and fill in missing info in a different colour. If this is repeated at a later point then you can see the progress you’ve made in remembering key content.
Try the revision questions (and check your answers).
Test yourself on the flash cards you’ve made.
Test yourself on the mind maps you (may) have made.
Self quiz (or get other people to test you).
Use GCSEPod to review areas of weakness.
Exam questions (closer to the exam).
Spacing Task (grids). These are what we have used in our spacing lessons during the year based on timings outlined here:

Download Scientific Detection (Analytical Science) at: https://www.dropbox.com/s/fz0x1amfxnyjld9/Spacing%20Lesson%20%20%20%20%20%20%20%20%20%20%20Analytical%20Science.docx?dl=0

Download Food for the Future 1 at: https://www.dropbox.com/s/c8e4nk1957ztr4b/Spacing%20Lesson%20%20%20%20%20%20%20%20%20%20Food%201.docx?dl=0

Download Food for the Future 2 at: https://www.dropbox.com/s/wuyp3k2imx3uylg/Spacing%20Lesson%20%20%20%20%20%20%20%20%20%20Food%202.docx?dl=0
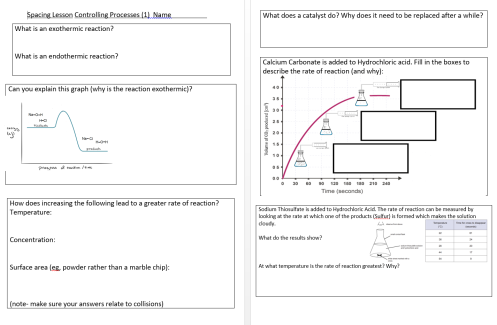
Download Controlling Processes 1 at: https://www.dropbox.com/s/2defc57eybgmgf0/Spacing%20lesson%20controlling%20processes%20part%201.docx?dl=0
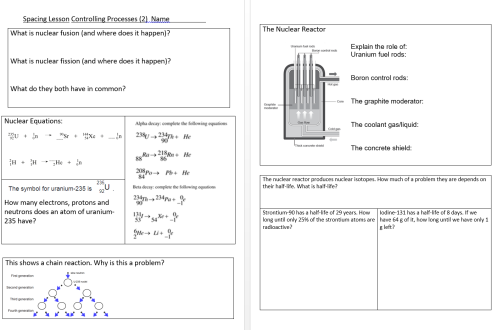
Download Controlling Processes 2 at: https://www.dropbox.com/s/kr3wx0zjda46aqa/Spacing%20lesson%20controlling%20processes%20part%202.docx?dl=0
Download Materials for a Purpose 1 at: https://www.dropbox.com/s/dolpzv06i26squd/Spacing%20Lesson%20%20%20%20%20%20%20%20%20%20materials%201.docx?dl=0
Revision questions (and answers)
Scientific Detection Questions – Answers
Food for the future 1 Questions – Answers
Food for the Future 2 Questions – Answers
Controlling Chemical Processes 1 Questions – Answers
Controlling Chemical Processes 2 Questions – Answers
Materials for a Purpose 1 Questions – Answers
Materials for a Purpose 2 Questions – Answers
GCSEPod Playlist Links:
| GCSEPod Playlist Link | ||
| SD | Scientific Detection | https://members.gcsepod.com/shared/playlists/playlist/467700 |
| FF1 | Food for the Future 1 | https://members.gcsepod.com/shared/playlists/playlist/467719 |
| FF2 | Food for the Future 2 | https://members.gcsepod.com/shared/playlists/playlist/467734 |
| CCP1 | Controlling Chemical Processes 1 | https://members.gcsepod.com/shared/playlists/playlist/467749 |
| CCP2 | Controlling Chemical Processes 2 | https://members.gcsepod.com/shared/playlists/playlist/467767 |
| MFAP1 | Materials for a Purpose 1 | https://members.gcsepod.com/shared/playlists/playlist/532074 |
| MFAP2 | Materials for a Purpose 2 | https://members.gcsepod.com/shared/playlists/playlist/552629 |

This is a standalone blog but it also links up with parts 1 and 2 of my TLT17 session. Part 1 looked at Myths and Non-negotiables. Part 2 looked at Planning for Inclusion, Differentiation and Challenge. This short, third part looks at classroom culture and how the most responsive teachers are also the best at differentiation.
Once you have planned the lesson, taking into account possible pupil misconceptions as well as what part of the task some may struggle with, the lesson (or series of lessons) is delivered. What next? Well, it depends (of course).
A large part of the teacher’s craft is how successfully they respond to pupil need during lessons. This is described perfectly in this blog by @atharby and these improvised responses are underpinned by the teacher’s knowledge of the students.
Dylan Wiliam tweeted this fairly recently (well, OK, 2013):

This tweet really got me thinking about the difference between the teachers that are the best “formative assessers”, the teachers that are the most responsive and the teachers at who are the best at differentiation.
I don’t think there is a difference. I think real time differentiation and repsonsive teaching is exactly the same thing.
So the question is, how can we build a classroom culture where we can truly know our students and where we can respond to the needs of each learner?
- You have got to know your students. This is such an important point which nobody would disagree with. Some prior data is very important. The best way to describe building up the knowledge of your pupils is to think about having a schema in your brain for each of the pupils you teach. This schema is made up of every interaction you have had with the pupil. Every question, every answer, every conversation. It will be made up of every single piece of work you have looked at, whether assessed with half a page of feedback given (!!) or simply read as part of whole class feedback. Or simply read as you circulate around the room.
To be honest I have always taken building up this knowledge for granted because I have taught my classes for at least 5 hours a fortnight since the start of my teaching career. For subjects that see more classes and for fewer hours, this does represent a challenge. I know some teachers that use class photos from SIMS as they mark pupil work so they can associate the work with the name as wall as the photo (thus building up the internal schema of the pupil). Our ICT department have individual pupil folders for homework and on the front of each folder is a photo of the pupil. Markbooks can come in handy as long as they contain some key assessment data. It is important to remember that the most effective testing will be when we don’t collect scores in off pupils and so keep the stakes of testing as low as possible.
- Classroom routines and norms must be truly inclusive. You cannot be a responsive teacher (or a great differentiator -same thing) unless you run a truly inclusive classroom.
Hands up questioning should never be a regular feature. It allows pupils to opt out of thinking. And if they opt out of thinking then you can’t get, or give feedback on their thinking. Cold call is preferable every single time. It is also a great way to differentiate as you can ask a variety of pupils a question and give each a question just outside their comfort zone.
However, there must be a number of questions that are answered by every pupil in the class. Feedback of everyone’s responses must be sought by the teacher (@Doug_Lemov calls this “show me”. This could be achieved by using whiteboards. Probably the best way is through designing multiple choice “hinge questions” that tell you which pupils are right but also which pupils are wrong- and why!! This blog by @HFletcherWood clarifies what good hinge questions look like. Craig Barton (@mrbartonmaths) calls them diagnostic questions and they feature in his brilliant book.
Here is an example of a good hinge question:
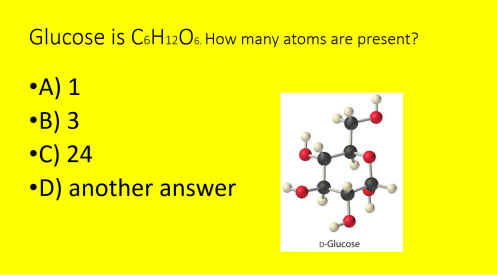
If pupils answer A) then I can assume they are getting molecules and atoms confused.
If pupils answer B) then I can assume they are looking at the fact there are 3 different elements rather than correctly answering that (C) there are 24 atoms in glucose. If they go for D) it may be worth exploring, perhaps away from their peers exactly what they think the answer is (and why).
BUT, it is what happens next which is key. It is all very well thinking that 75% of pupils get a hinge question right so we can move on. What about the 25% that got it wrong? There are a multitude of things that can be done but the mistake/misconception must be put right. Pupils giving wrong answers to the hinge question allows you to be truly responsive. Read Harry’s post or Craig’s book for detail on what that response could look like. In the above example, pupils that opted for C) could design a question where A) and then B) would be the right answer whilst the teacher circulates around those that got it wrong.
Put simply, 75% of pupils getting a hinge question right is evidence that the concept doesn’t need wider reteaching. However it does mean the 25% need further input. And it is likley that the feedback is needed right now.
This simple model of feedback only works if you regularly get meaningful feedback from the whole class:

Feedback from hinge questions can be done via whiteboards, a show of fingers, rock/paper/scissors, Kahoot (not a fan) or hands up as you go through each option. I have started to experiment with Plickers to collect hinge question data. One pupil in my Year 11 class says she much prefers this as she was embarrassed to raise her hand in case she was revealing that she had a wrong answer (despite me feeling that I had achieved what @Doug_Lemov calls a culture of error in my classroom).
- No dumbing down. It is tempting sometimes to use everyday language rather than the language of the subject, particularly when teaching some of our lower attaining students. The problem here is that the very pupils that lack this subject knowledge and vocabulary will be further disadvantaged by this. The outcome can only be incomplete schema with gaps that will make further learning even more difficult. On occasions, a teacher may think that I am going to miss out topic x because it is going to be beyond “these kids”. On occasions there is justification to miss certain topics out. It can buy more curriculum time for topics that may be more important to master for future learning. However, a teacher should see it as a challenge worth accepting to nail even the most difficult concepts with lower attainers. With great planning (perhaps tapping into departmental expertise) and responsive teaching (based on feedback from every student), why not?
- Use desirable difficulties to build storage and retrieval strength. There may be a temptation to not use desirable difficulties (spacing, retrieval, interleaving) with lower attaining students as very often the prevailing thought can be that they are struggling enough anyway so why add in more difficulties? Again, this is myopic. I would argue that lower attaining students need to utilise desirable difficulties even more than higher attaining students. Perhaps one reason why some students struggle is because they have a more limited working memory than others. If this is the case then there is even more need to commit some key concepts to long term memory. This will make future learning easier (and reinforces the importance of dual coding in the teaching phase). It is possible that some pupils are lower attainers because their memory’s retrieval strength decreases quicker. Again, all the more reason for space retrieval. However, some additional cues could be made available if retrieval strength has dropped too much. (For more on storage and retrieval strength read this blog by @EdScientists or this by me).
A spacing task might look like this (given as spacing homeworks to my Year 10 class last year):

can be quickly tweaked to this:

The difference is minimal. It doesn’t do the retrieval for them. But it might just be enough in terms of cues to help them retrieve.
In short, it is all very well saying that you respond to the needs of your students. But do you have a classroom culture where your classroom routines are truly inclusive? Do they allow you to get feedback from all your students? Do you know your students and what represents excellence for each of them?
Responsive teaching is what formative assessment should have been called. It is also what in class differentiation should be called.
Constructive comments, as always, are welcomed below.
This is part 2 of 3 of my #TLT17 session. In part 1 I acknowledged this blog by @teacherhead, this blog by @atharby and this blog by @chrishildrew. I must confess that I hadn’t realised just how much Chris’s blog had influenced much of my thinking, particularly over the use of the term ability.
Part 1 was more about the philosophy behind inclusion, challenge and differentiation. This blog is more on how we can plan lessons which are challenging but inclusive.
In terms of ensuring challenge, I use SOLO taxonomy to set my expected learning outcomes. They look something like this:

I know that SOLO has its critics but for me it’s a key way that I ensure that what I am asking my students to do is sufficiently challenging. This blog by @Andyphilipday advocates SOLO but spells out the dangers of its misuse (particularly in thinking it is a race to extended abstract). For me, SOLO works because it means that making links between well understood (and remembered) scientific facts, ideas or concepts is at the heart of what I ask my pupils to do. And this means that I set challenging tasks.


The key to my use of learning outcomes for pupils (the so that part) is that my expectation is that all pupils will be able to achieve all of them. There is no some, most, all. I may need to provide additional support to some pupils but my expectation is that all will strive to get/do/achieve/whateveryouwanttocallit each learning outcome.
Lesson planning should always start with what do I want pupils to learn (rather than what activity they are going to do). Once that is established, you design tasks that enable pupils to work with this content. SOLO really helps me design challenging tasks.
Whether you use SOLO or not (and I really do recommend using it, particularly in content heavy subjects) the most important question to ask when planning your lesson is:

Of course it may be for a sequence of lessons but you get the drift. This means looking at the content that you are teaching as well as the work that you are going to ask pupils to complete.
This photo is from @ChrisMoyse and it features in our school’s 10 features of effective lessons. The image is springing up in many of our classrooms.
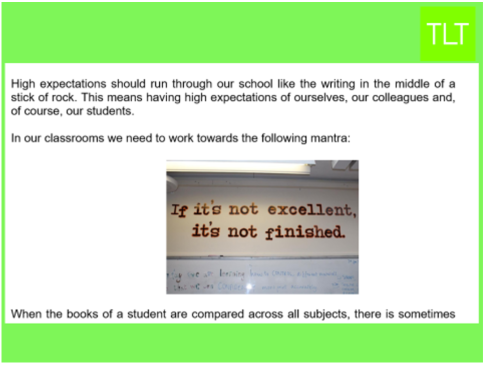
But the question is, does your task design allow students to show excellence? In addition, knowing your students is vital. Our students will have different starting points so what represents excellence for one pupil might not represent excellence from another pupil. The key here is knowing your students well enough to know what excellence looks like from them AND THEN having an expectation that what represents excellence will change as the bar is raised for each and every student over time.
In terms of how we can successfully differentiate, a google search typically gives something like this:
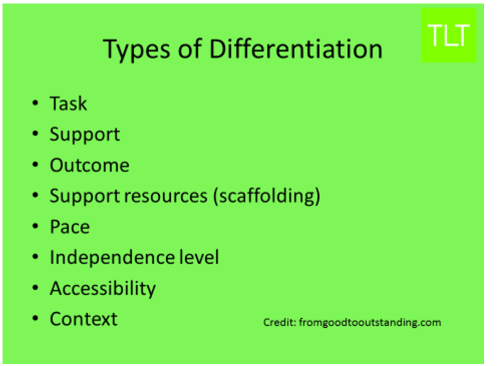
This list is by no means exhaustive and it can quickly become quite overwhelming if you consider every possible way that differentiation could be achieved.
For manageable differentiation (big nod to @atharby here), think about differentiation before and during. The before is when you plan the lesson (covered in this blog), and the during is obviously as the lesson unfolds.
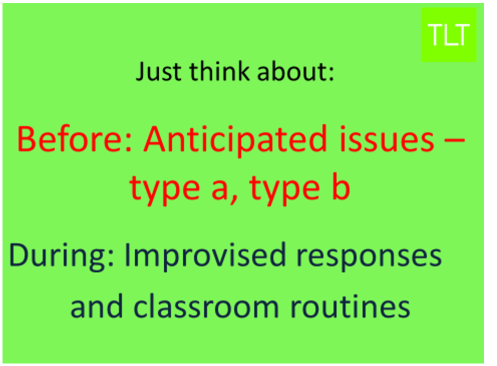

Type a is linked with your teaching (particularly your explanations) and type b is linked with the pupils and their undertaking of the task(s) you have set them. Type a is to do with the misunderstandings and misconceptions that pupils can have with the content. Type b is to do with pupils’ difficulty in completing the task (and what help/support/scaffolding may be needed).
Before -Type a- plug gaps before they appear.
This is where subject knowledge really comes into it. Over the last few years I have been a little sceptical when I have read about the importance of subject knowledge. I wondered whether having a better understanding of action potentials and potassium gates would help me teach KS4 Biology. But if subject knowledge is linked with what and how pupils think about my subject then I am fully on board. We have beautiful, finely crafted cathedrals of knowledge in our brains (our subject schema) and we try to build this schema in our pupils’ brains. The curse of the expert means we sometimes overlook what it is to be a novice with incomplete schema. We have to remember that very often we are building and linking new knowledge with shaky prior knowledge. Our pupils’ cathedrals of knowledge (their schema) are lacking the necessary foundations to build on. This is where subject expertise comes in. This is particularly true lower down the school. The better we can teach, with common misconceptions and misunderstandings at the forefront of our minds, the better the foundations of their subject schema will be. And quite possibly (well almost certainly), less differentiation will be needed further up the school. We have to plug gaps before they appear, and this means having a clear understanding of what these gaps may actually be.
A few years ago, when teaching a Year 9 maths class, we had a few lessons coming up on adding and subtracting fractions. Even with my limited subject knowledge I anticipated that working out the lowest common denominator would be the bottle neck of the learning. This would be the area that most would struggle with. This would be the area that the biggest gap could appear.
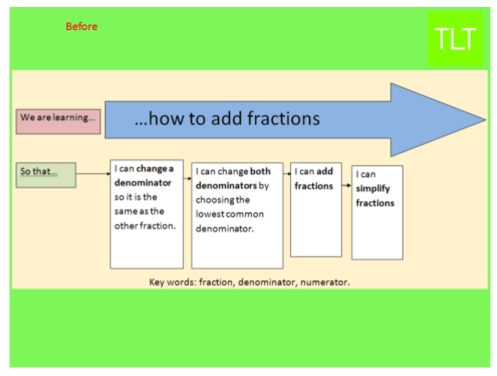
In an effort to plug this gap before it appeared, the lesson started with recap work, a starter task on lowest common multiple. In fact, through spacing, I had ensured that pupils were still comfortable with working out the lowest common multiple of 2 numbers. Once the starter had been done, and any mistakes reviewed and discussed, pupils did not struggle with choosing the lowest common denominator. That simple anticipation, made when planning the lesson, had meant that the lesson went far better than it might have. If I hadn’t done the starter then it is likely that some pupils would have struggled which could have left me thinking that I should have differentiated in the lesson.
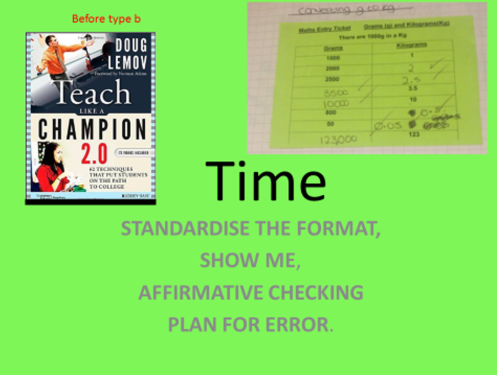
Staying with Maths, I was teaching a lesson where, if pupils were to be successful, they would need to be comfortable with mixed units of grams and kilograms. I anticipated that this may be the bottle neck of the lesson (or the biggest gap in their knowledge) so I gave the pupils an entry ticket which they did before they started the main task. This ensured that any difficulty in completing the task would not be because they couldn’t convert between units fluently.
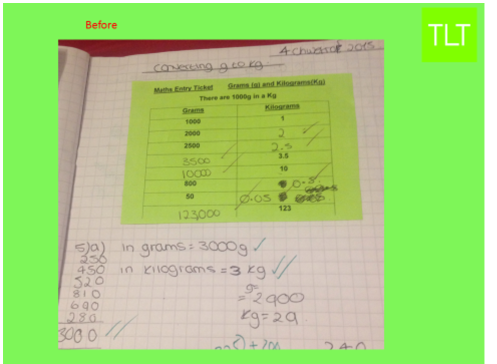
I will return to entry tickets later on.
The above examples are just one way of plugging the gap. The usual and most straightforward way would be to plug the gaps during your explanation. The best example I can give is teaching KS3 students about respiration. It is an ongoing frustration that pupils continue to conflate breathing and respiration. When teaching KS3 pupils, I will make explicit the links between the 2 processes but also explain how they are different. I will even cover WHY people conflate them (the lungs being part of respiratory system, artificial respiration etc). I won’t leave it to chance that they will be clear on the differences between the 2 processes. I will also revisit this key concept in the coming months. This should ensure my pupils get to KS4 with a tacit understanding of what respiration is (and why it is NOT the same as breathing). Again, this will limit the need to differentiate later.
This is where dual coding comes in too (see part 1). If your explanations can plug gaps and are accompanied by complementary graphics that limit cognitive load, then the need to differentiate at a later date will be reduced.
So type a (of the before) is all about knowing the common misconceptions and misunderstandings your pupils may have. And we plug those gaps before they appear. Of course it is impossible to predict every misconception pupils may have (this is where formative assessment and classroom routines come into it) but we can plug the usual, common ones. And the more years that we teach, the more aware we should be about these common gaps. These common gaps should be discussed in subject meetings. And plugged in class. Before they appear.
Before – Type b- difficulty in completing the task.
Picture the lesson: you have delivered your explanation and plugged the main gaps before they appear. Now the pupils are going to undertake their task. The trick is to anticipate the difficulty that pupils may have with the task and how they can be supported.

Scaffolding is a great term as the support that you provide individual pupils can be reduced and removed as time goes by. I stole a great analogy from @BodilUK‘s blog on scaffolding. There are 2 types of support that novice bike riders can be offered. The top right is the traditional stabilisers option. The bottom right is learning on a balance bike. Bodil rightly argues that when children learn to ride bikes, the key is that they successfully learn how to balance. Stabilisers take away the need to learn how to balance. So whilst children can have the illusion that they are successfully riding their bike, the stabilisers have done all the hard work for them. Far better to use a balance bike. The pedalling has been removed but children have to learn and master the key attribute of balance.
Selecting the right scaffolding for our learners is analogous to this. It should help them access and complete the task but it must not do the thinking for them. The scaffolding must not do the cognitive work for the learner.
If you are doing a clozed exercise (pupils fill in the blanks) and you provide the missing words at the top of the worksheet then this will support pupils but won’t do all of the thinking for them (as long as some of the words could possibly go in multiple gaps). However, if the first letter is provided like this:
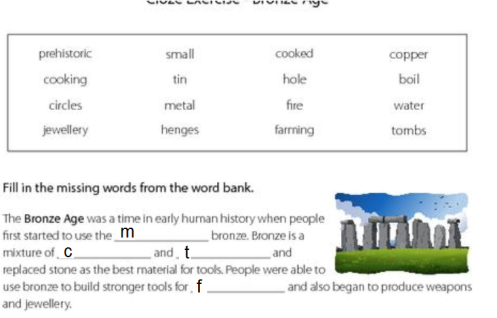
then it becomes nothing more than a matching exercise. The first gap is metal by default as it is the only m. Using a resource like this removes, or massively reduces the thinking pupils have to do. It must be avoided.
I am not a big fan of closed exercises but without the first letter this is far more legitimate task. Disclaimer- I used a google image search for the resource and added the first letter myself (on paint). This is not what the resource looked like. The above was just to illustrate the point.
A few years ago I was teaching the similarities and differences between optic fibres and satellites (GCSE Physics). I gave pupils a venn diagram:

I would then reveal 10 sentences on the board and pupils would write each sentence in the relevant section of the venn diagram. In the first year that I did this, many pupils would finish in the “expected” time but some pupils (whether to do with speed of handwriting or processing issues) would not. In fact, many would have only completed 3 sentences by the time I was going through the answers. This meant that they only participated in a small part of the activity and the task design had limited their thinking.
The following year I simply used the same 10 sentences but with 1, 2, 3 etc before each sentence. Pupils then had to put the number in the correct area of the venn diagram. All pupils were finished within a few minutes. All pupils had thought about where each sentence should go. Again, it didn’t look like differentiation but without it I would have excluded some pupils from the task and left me with the feeling that I should have differentiated. This tweak is a good example of how, when planning our lessons, we need to critique every task we ask pupils to do, before we consider what scaffolding is required. I am not a fan of clozed exercises. When pupils are copying out closed exercises into their books it is a criminal waste of learning time (unless the purpose is handwriting practice). The only thinking involved is what goes into the gaps. The rest is just copying. What a waste of time. The change in approach with the venn diagram freed up precious learning time by removing pointless copying time.
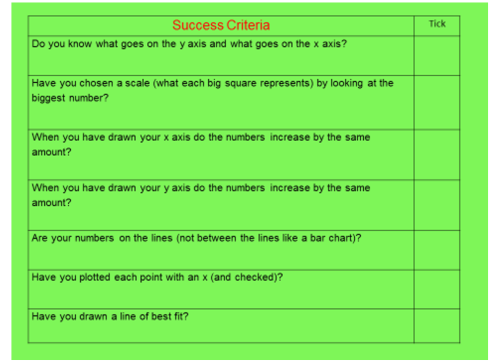
Here are some more examples of scaffolding:

This could be used by some pupils as their actual graph. It could be used by others to help set out their graph. Some pupils may not need the scaffolding at all. These could be available face down on the table and pupils use the scaffolding if they need to. This still ensures that pupils plot a graph. This scaffolding can be changed to this (as time goes by as pupils gain in independence and graph drawing skills):
More examples of scaffolding are:
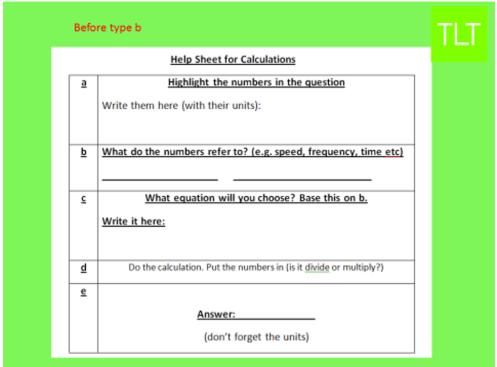
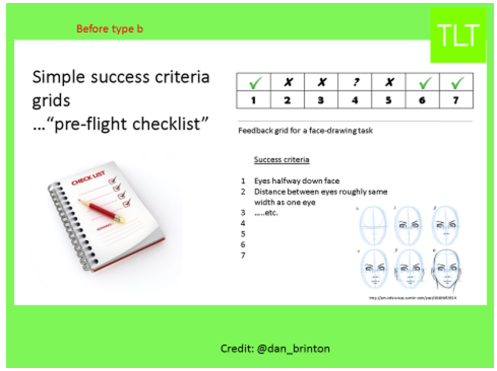
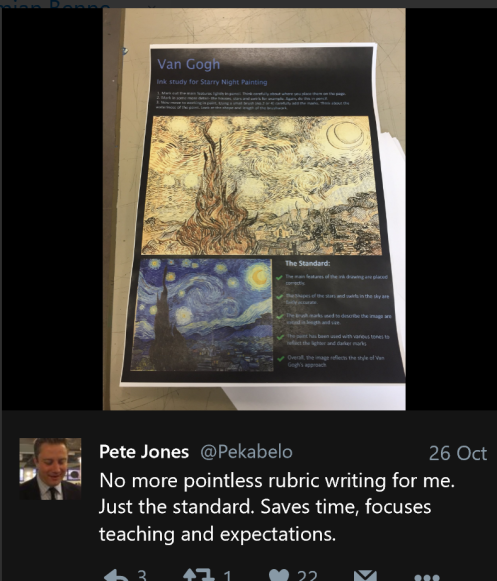
(Post session addition)- or this brilliant one from @Pekabelo where a rubric is replaced with a standard – the expectation is all pupils work to meet it:
Or this by @atharby:

If you are teaching a lesson on fair trade in geography you may want pupils to access this information (credit to Matt Grant and also @ASTsupportAAli):

You may anticipate that some in your mixed attainment class are going to struggle with the reading, particularly because of the vocabulary involved:

There are 3 choices available for you pre lesson.
- Give some pupils a reduced version with many of the key words removed. The massive downside to this is that these are the very pupils that need to be exposed to the key academic vocabulary. If you withhold the vocabulary as it is too demanding for them then they are going to fall even further behind their language rich peers. How can they close the gap with this approach?
- Plough on with the text and help students as they work through it. Better than point 1 but plenty of issues here. Or:
- Tweak the resource:
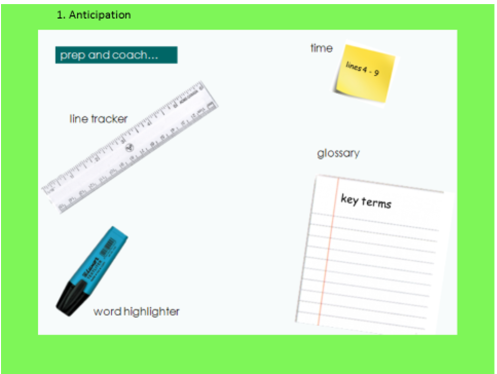

Go through a few lines at a time. “Coach” pupils to highlight key words that they are unsure of. Then define them as you move through the lines.
My wife made a valid point when I showed her this. She asked what if pupils are too embarrassed to highlight and communicate that they don’t know certain words. The answer to this is to ensure that you create a classroom culture where it is ok to make mistakes and for pupils to be comfortable to admit they don’t know certain things. As teachers we set the classroom climate and we must strive to have a classroom of high expectations hand in hand with pupils being comfortable being wrong as it is just a part of learning. I know this sounds cheesy (and is) but that is what we strive for.
Post blog edit. Huge thanks to @JulesDaulby for suggesting the use of immersive reading in word 365 online (see here). Pupils that have decoding issues could use this programme. There is also free text to speech in word 2016 (see here). These “read” the words and the reading speed can be varied. Electronic textbooks can be used this way and pupils with visual impairments or decoding issues can have them for free.
It may well be that for some tasks scaffolding won’t be appropriate and what some students may need is simply more time with the teacher. When I used to teach Maths I regularly used “entry tickets” (idea from @Doug_Lemov’s fantastic TLAC2).
Entry tickets are given to pupils and they need to complete them successfully before they attempt the main piece of work. Pupils bring them up to my desk and if they get them all right they start the main task. The entry ticket task as to be linked with a key element of the main task. More detail is provided here.
The way that I used these entry tickets would be to (as subtly as possible) hand them out to the higher attaining students first. By and large, these students would finish quickly, come out to my desk, get all answers correct and move onto the main task. This then means I am free to spend more time with the students that may be struggling with the task. I could reteach a small group or make further explanations an individual basis. Whatever I do, this entry ticket has bought me some time to spend with pupils that are struggling. Very often this is more appropriate than providing scaffolding. You could argue that the actual physical entry ticket is “gimmicky” but the principle can be applied in many different ways. And it can really help make your classroom an inclusive place.
This amount of thought required at the planning stage may seem overwhelming. But as a teacher gains experience then planning to account for type a and type b will become second nature. It will just become a part of planning lessons.
This is the end of part 2. Part 3 will look at what should happen during the lesson. This will focus on ensuring we have robust, embedded classroom routines that allow us to be truly responsive.
